- Create a project named Lab9a in NetBeans.
- Copy needed files into your src folder.
Right click on each of these:
and choose Save Target As... (or Save Link As...) and save the files in the src folder of your project.
- When the proper files are in place, run the project to see
the output. This program uses an array of
Studentobjects to represent data describing 15 different students. The output is printed in aJTextAreaGUI component using several append method calls.
- In the fillArray( ) method of the
MUPanelclass, change the first element in the array (element 0) so that it represents you. Change "Samantha Student" to your name, change the dorm to your residence hall (or use "off-campus" if you don't live in a residence hall), specify a code number that indicates your current class (1=Freshman, 2=Sophomore, 3=Junior, 4=Senior), specify aBooleanvalue indicating whether or not you are an intercollegiate athlete, and put in a decimal number representing your GPA (you may use your actual GPA or a made-up value, as you wish).
Next, change the number of students so that the array will contain two moreStudentobjects. Then add instantiations for a sixteenth and a seventeenth student in thefillArray()method that represents either friends of yours, or made-up people (could be your favorite historical figures, athletes, movie stars, etc.).
Run this program and observe the results. The output should state that 17 students are listed, and the average GPA should be different than it was originally.
- Create and invoke a displaySophomores method.
Make a copy of thedisplayEntireArray()method, then paste a copy of this code immediately after the method, and then change the name of the newly copied method todisplaySophomores.
Change the body of thedisplaySophomoresmethod so that it only processes students in the array that are Sophomores (have aclassCodevalue of 2). To do this, place anifstatement immediately inside theforloop, and test to see if the result of thegetClassCode()method called for element numberkof thestudentRosterarray is equal to 2. Only if this test evaluates as true should the student in positionkof the array be printed and her gpa added to the total. Also, edit the text strings in this second block so that the first line printed by the block is "Listing of Sophomores".
Add a line in theMUPanelconstructor method to invoke this method; it should be invoked AFTERdisplayEntireArrayhas been invoked. Run the program now; you should see two sets of output lines in the JTextArea: the original list of all students, and a second list showing only those students who are Sophomores.
- Create and invoke three more methods, as follows:
- One method displays a listing of students who are athletes,
- Another method displays a list of all students who are on
the Dean's List (GPA >= 3.5),
- The third method displays a list of all the students who
live in "McMaster Hall" (Hint: to test a
Stringfor equality, use.equals("McMaster Hall")-- don't use the==operator for the test).
MUPanelconstructor method to invoke these methods.
- One method displays a listing of students who are athletes,
- After ensuring
that your program works propertly to display the students in the various
collections, close this
project.
- Create a new NetBeans project named Lab9b.
- Copy starter file into your src folder.
Right click on MUPanel.java and choose Save Target As... (or Save Link As...) to save the file in the src folder of your project.
- This program WILL NOT run, because
MUPanel,displayEntireArrayandfillArraytry to use an array ofBookobjects, and theBookclass definition is not supplied. Your task for this step of the lab is to provide a complete class definition for aBookclass, that allows the program to run correctly. We will also learn about the "Insert Code" feature of NetBeans that will do a lot of the work of writing a new class definition for us.
TheBookclass must have three (3) private data members: aStringfor the book's title, aStringfor the book's author, and anIntegerfor the number of pages in the book. We also will need a constructor method for the class, agetNumPages()method that returns the number of pages in aBookobject, three setter methods (one for each private data member of theBookclass), and atoString()method.
First of all, right-click on the src folder in the NetBeans project tree in the upper-left panel, and choose "New | Java Class" from the pop-up menu. Enter "Book" (without the quotes) as the name of the class and click the Finish button. This creates an empty class definition. Inside the curly braces of the class definition, declare three properties or private data members:Strings for the title and for the author of the book, and an Integer for the number of pages of the book (use the namestitle,authorandnumPagesfor these three properties.
- Now we need to write methods for the class that should be a part of pretty much every
class we write: a constructor, getters and setters, and a
toStringmethod. This is such a basic task that NetBeans includes code generation features to do this automatically for a class once we have declared the properties that the class will contain. We will use this code completion feature to save ourselves some time and work in getting theBookclass to be operational.
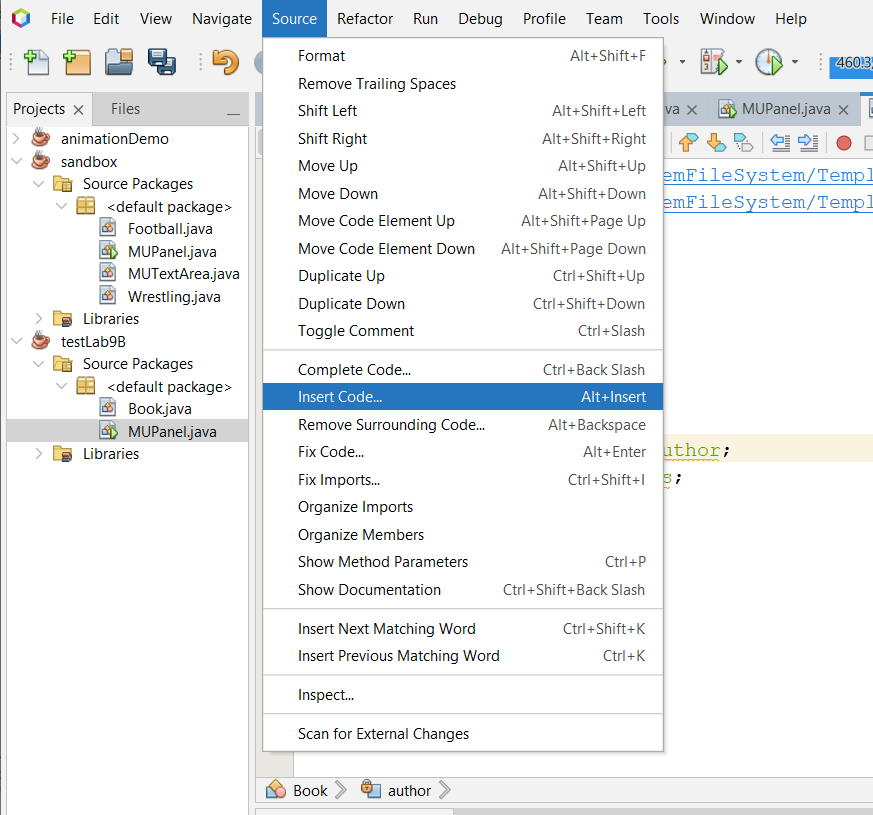
Make sure there is at least one blank line between the last variable declaration in your class definition and the closing brace, and position the cursor on one of those blank lines. Then from the top-level NetBeans menu (the one with the words "File", "Edit", etc. at the top of the application), choose "Source | Insert Code", as seen here:
A small pop-up menu will appear that is titled "Generate"; from the choices, select "Constructor...". Now you will see a dialog box that has a line for each of the properties that you defined for the class. Select all of the properties (you can either check all the checkboxes, or use the "Select All" button at the bottom), and then click the "Generate" button. Wow, how nice is this? Notice that NetBeans uses the same name for the properties and for the parameters of the constructor method, so the code must use the "this." notation that was discussed in class to resolve the naming confusion. This is a standard technique in Java programming.
- NetBeans can also automatically generate getters and setters for us. Choose "Source
| Insert Code" again, and this time choose "Getter..." from the Generate pop-up menu. Let's say for this program we will only need a
getNumPagesmethod; so that means that we should only check one checkbox in the dialog that appears, beside thenumPagesentry, and then when we click the Generate button only one getter is added to the class definition.
Choose "Source | Insert Code" another time, and choose "Setter...". We should add a setter for all three properties of the class, so do that now.
- We need one more method to complete the
Bookclass definition so we can run the starter program for Lab 9b — atoStringmethod. NetBeans will generate a very generic toString for us, and then we can edit the method so that the output is exactly the way we want it. Choose "Source | Insert Code" now, then choose "toString..." from the pop-up menu. Be sure the checkboxes for all of the fields of the class are checked, and click "Generate". Notice that the code that NetBeans writes displays the name of the class, and then the name of each field followed by the value of the field. Let's see what the result of thistoStringmethod looks like....
- Run the MUPanel.jave file now, and if you chose the proper names for the fields in
the
Bookclass, you should see the following output:
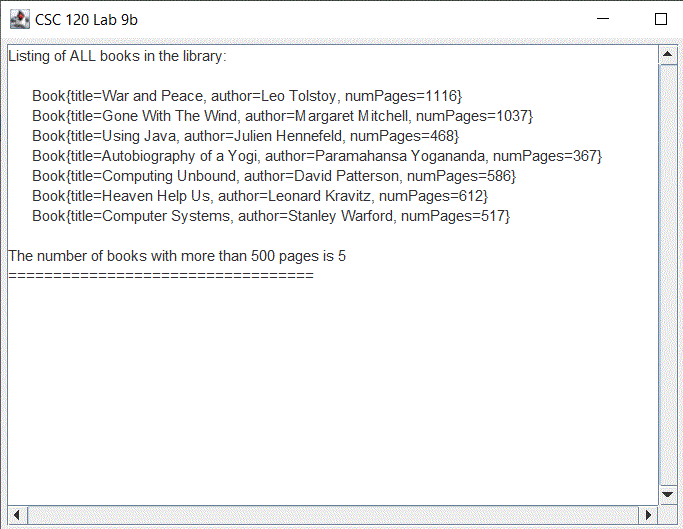
If you examine the code in MUPanel.java, you will see that it uses an array of Book objects that contains 7 books, and that the output shows the contents of each array element on a separate line. But what if we want a different format for the lines of our output? To change the output, we need to edit the code that NetBeans generated for ourtoStringmethod in theBookclass.
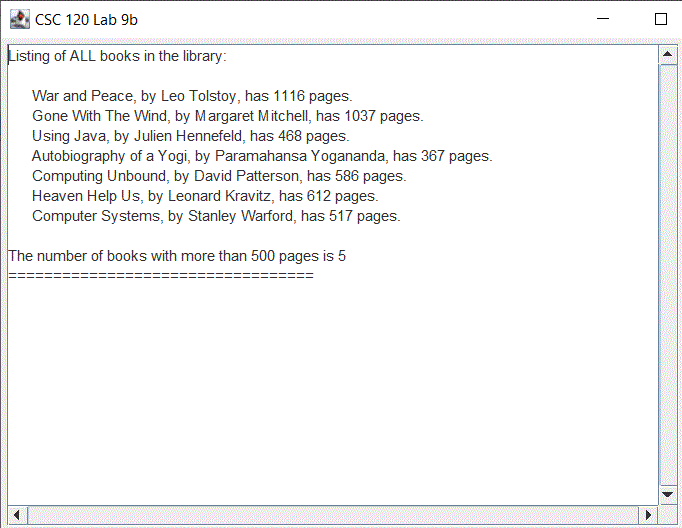
- Switch in the editor back to the Book.java file, and edit the body of the
toStringmethod so that the value returned has the following format:title_of_book, by author_of_book, has number_of_pages pages.
When you have correctly re-written thetoStringmethod, you should obtain output that looks like this (don't forget to put a period at the end):
- Now, let's add two more pieces of information to the
Bookclass: anIntegervalue representing the copyright year for the book, and aBooleanvalue representing whether the book is a hardback book or not. Now we will need a different constructor method for the class that accepts parameters for all five of the properties the class now contains. In theBookclass, delete the current constructor method, then use "Source | Insert Code" to insert a new constructor that instantiates all five properties of the class.
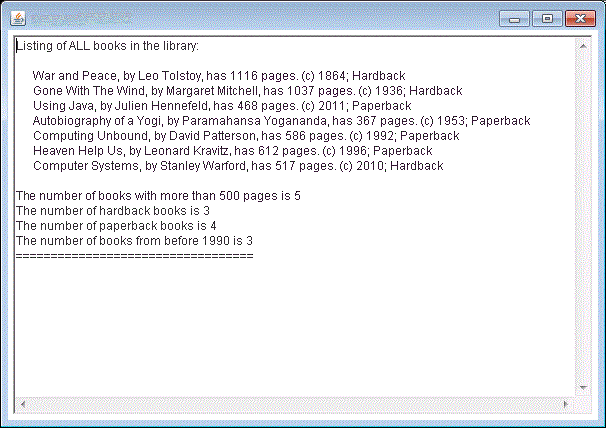
ThetoString()method for theBookclass should be edited as follows: first of all, replace the singlereturnstatement in the method body with this code:String answer = title + ", by " + author + ", has " + numPages + " pages."; return answer;This would do the same thing as the original code, but now we have a variable namedanswerthat we can use in an if/else statement, which we will do right now. At the end of the first line above, concatenate the string " (c) ", followed by the copyright year for the book, followed by the string "; ". Then, using an if/else statement, concatenate the string "Hardback" to theanswerString if thehardbackprivate data member is true, or the string "Paperback" if thehardbackprivate data member is false.
Also, be sure to add "getter" methods for both the copyright year and the hardback status value to the class.
-
The code in the constructor method of the
MUPanelclass (as well asdisplayArrayandfillEntireArray)will also need some modifications. For each book, you'll need to specify two more pieces of information when the book is instantiated. Use these values:
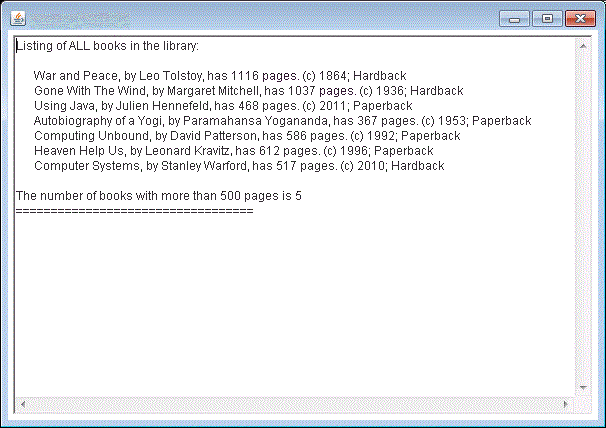
Title Copyright Year Hardback? War and Peace 1864 true Gone With The Wind 1936 true Using Java 2011 false Autobiography of a Yogi 1953 false Computing Unbound 1992 false Heaven Help Us 1996 false Computer Systems 2010 true
When you have correctly modified theBookclass definition andMUPanel, you should obtain output that looks like this when you run the program:
- Uncomment the
append()method calls indisplayEntireArrayand addifstatements to theforloop so that the program calculates the totals and produces the output shown in this final screen shot: